Deployment Manual (for Windows)
1. System and Software Requirement
| Item | Requirements |
|---|---|
| System Version | Windows 10 or higher, or Windows Server 2016 or higher, 64-bit system |
| Dependency Software | None |
| System Time | JST timezone, with a deviation within 5 minutes |
| CPU | It is recommended to have more than 4 cores, with a frequency of over 2.0 GHz For x86 (AMD64) architecture, it must support avx2, fma, and sse4.2 instruction sets |
| Memory | More than 16 GB |
| Disk Space | More than 500 GB |
| Ports Used | 7100 (default) |
Please check whether the relevant items meet the requirements before deployment.
2. Resource Package
| Resource Package Name | Description |
|---|---|
| check_env_win64.zip | Environment check tool |
| asr-integratd_install_xxxxx.exe | Main program and installation program |
| asr-model_xxxxx.iso | Speech-to-Text model (and installation program) |
3. File Structure
| Filename | Description |
|---|---|
| ffmpeg\ | Used for converting audio file formats (not included in the Premium Edition) |
| hotword\ | Hotword functionality component |
| log\ | Log files |
| model\ | Model files |
| audio\ | Saved audio files |
| script\ | Predefined scripts |
| asr-integrated | Main program |
| service.toml | Speech-to-Text service configuration file |
| start.conf | Startup configuration file |
| *.db , *.dll and other files | Database files, Dynamic link libraries, and other necessary components |
4. Quick Start Guide
4.1. Run Environment Check
Unzip the environment check file check_env_win64.zip . Run the checkEnv_win64 program, and the content is displayed as follows:
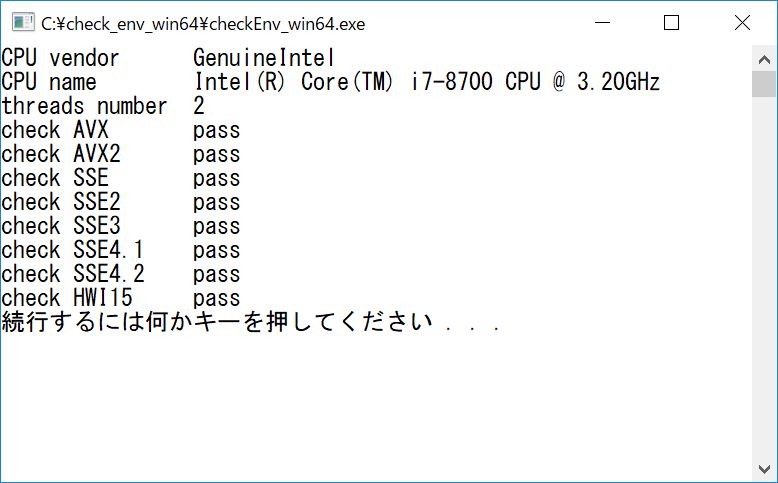
If all items show pass, it means the hardware environment supports the system operation. If there is an error, it means the hardware environment does not meet the conditions for system operation.
4.2. Install the Speech-to-Text Main Program
Double click on Speech-to-Text_System_V2.x.x_Installer.exe ,and follow the wizard to execute the installation process. Select the location where you want to install.
- The language of the installation program can be selected, and it's NOT related to the languages supported by Speech-to-Text System itself.
- It is recommended to have a disk partition size of over 200 GB.
- The installation path should not contain spaces.
Select the edition to install. If you are unsure, please confirm with the pre-sales team which edition is suitable for you.
| Option | Function |
|---|---|
| Pro Edition | Short Speech Transcription, Real-time Speech Transcription, Audio File Transcription |
| Premium Edition | Short Speech Transcription, Real-time Speech Transcription |
| File Edition | Audio File Transcription |
In the final step of the installation wizard, you can set the application to start automatically on boot. You can make this selection based on your needs.
After the installation is complete, you will be prompted to install the model. Please continue with the operations according to the deployment manual.
4.3. Install Speech Recognition Model
The model comes in two packaging forms, ISO and ZIP (based on what the pre-sales team provides), and the installation methods differ.
4.3.1. Installation Package in ISO Format
If the downloaded file is an ISO format image file (e.g., asr-model_ja-JP.iso), proceed as follows:
-
Double-click the ISO format installation package to mount the image file. Alternatively, right-click the file and select "Mount(マウント)".
-
Navigate to the newly added drive and double-click
install.batto enter the model installation interface.The installation path of the model will automatically match the folder where the main program is located. If it does not match, please reinstall the main program.
-
Follow the installation wizard to proceed with the installation. The wizard will automatically detect the installed version of the main program. Enter
Yto confirm the installation version.InstallPath: D:\asr-integrated Pro Edition is detected. Please comfirm to install en-US model for Pro Edition (Y/N):Y -
The message
Installation completed.indicates that the model installation is finished. -
After completing the installation, right-click the newly added drive, select "Eject(取り出し)", and then you can move or delete the
.isoimage file.
4.3.2. ZIP Format Compression Package
If the downloaded file is a ZIP format compressed file (e.g., asr_ja-JP.zip), then:
Extract the compressed file to the model folder located within the main program's directory (e.g., D:\asr-integrated\model\).
If a prompt to overwrite files appears during extraction, select "Overwrite All."
When using Windows' built-in extraction tool, it may create an additional folder with the same name as the compressed file. Move all the folders from within that folder to the model folder so that the structure is similar to D:\asr-integrated\model\asr\zh-cmn-Hans-CN (but not D:\asr-integrated\model\asr_zh-cmn-Hans-CN\asr\zh-cmn-Hans-CN) to ensure proper functionality.
4.4. Launch for the First Time
Navigate to the main program directory asr-integrated and run the program by double-clicking asr-integrated.exe .
4.4.1. Activation via Command Line
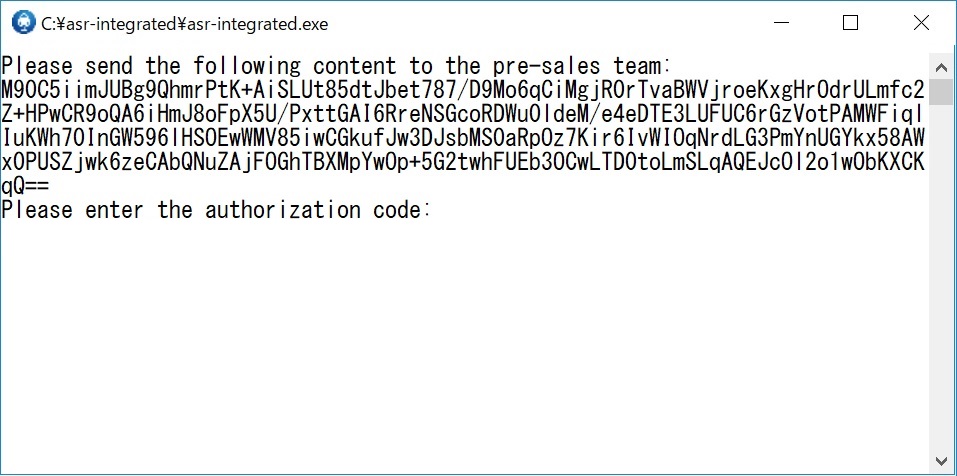
Upon the first launch, the system will display the following message, indicating that activation is required. Please follow the on-screen prompts to copy the content shown on the screen and send it to the sales staff to obtain an authorization code. Do not exit the program during this process.
Tip:
If it is not convenient to copy the machine code from the command line, you can refer to the "4.4.2. Activation via Web Page" section for alternative steps.
Paste the received authorization code into the command line window. Then press the Enter key to proceed to the next step.
Note:
Copy: Select the text with the mouse, and right-click to successfully copy it.
Paste: Right-click the mouse.DO NOT use other shortcuts to copy the machine code or paste the authorization code, as it may cause the program to exit, leading to the invalidation of the machine code/authorization code.
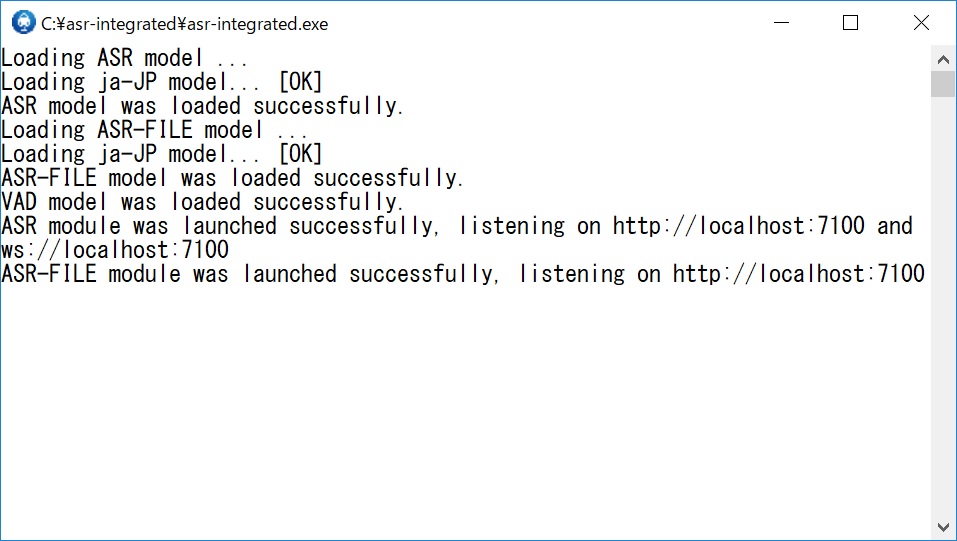
After waiting for a few seconds, the following content will be displayed, indicating that the model has been loaded successfully and the Speech Recognition (ASR) and/or Audio File Transcription (ASR-FILE) services have been correctly started. The screen will show the port where the services are running, which defaults to 7100.
If an error is prompted after entering the authorization code, it indicates that the activation has failed. In this case, please double-click asr-integrated.exe and perform the activation again.
Note:
After the activation is completed, the activation information will be saved on this machine. Do not change the hardware, as it may cause the activation to become invalid.
4.4.2. Web Activation
Keep the asr-integrated.exe process running. If it is not running, navigate to the main program directory asr-integrated\ and launch the program by double-clicking asr-integrated.exe .
Enter server_ip:port/admin in the browser on the local machine or another machine within the LAN, such as 192.168.1.2:7100/admin, to open the admin panel.
Click the Generate button, copy the machine code (or scan the QR code on the right), and send it to the pre-sales team to obtain an authorization code. During this period, do not regenerate the machine code, as doing so will invalidate the previously generated machine code.
After receiving the authorization code, copy and paste it into the text box below, then click the Confirm button to complete the activation. After activation via the web page, you will need to manually restart the Speech-to-Text service.
4.5. Shutting Down the Program
To stop the Speech-to-Text program, you can simply click the × button in the upper right corner of the window.
4.6. Restarting
Run the program again by double-clicking asr-integrated.exe . Wait for the screen to display a success message, indicating that it is ready for normal use.
5. Advanced Operations
5.1. Background Startup and Related Scripts
Use scripts to register the program as a system service for background startup. The related scripts are located in the script directory and can be run by double-clicking (administrator privileges required).
| Function | Script File | Note |
|---|---|---|
| Register as a Windows Service and Start | install.bat | Register the service only after activation; install once to register for auto-start |
| Stop Service | stop.bat | Use this script to stop the background service after registering as a Windows service |
| Start Service | start.bat | Use this script to start the service in the background after registering as a Windows service |
| Stop and Unregister from Windows Services | uninstall.bat | Stop the currently running service and remove the Windows service (including auto-start); it will NOT uninstall the program |
5.2. Other Scripts
Other scripts are located in the script directory and can be run by double-clicking.
| Function | Script File | Note |
|---|---|---|
| Clear the authorization | remove-license.bat | Clears authorization (please use with CAUTION) |
| License Backup Management | license-backup.bat | Export/import license backup files |
Note:
Only permanent license can be exported as a backup file.
Non-permanent license can be only exported as a demo file for debugging interface purposes, which do not contain authorization information and cannot be used for actual use.
5.3. Other Launching Arguments
When starting the program from the command line, you can use arguments to achieve the following functions.
Format:asr-integrated.exe [option]
| Argument | Function |
|---|---|
-c | Check the authorization information. |
-g | Generate a machine code. |
-p="authorization code" | Enter the authorization code. |
--conf="file path" | Path to the service configuration file. |
--remove-license | Clear the authorization (Please proceed with CAUTION). |
--export-license="file path (up to the directory)" | Export a license backup file. Only permanent license can be exported as a backup file. Non-permanent license can be only exported as a demo file for debugging interface purposes, which do not contain authorization information and cannot be used for actual use. |
--import-license="file path (up to the file)" | Import a license backup file. Only permanent license can be exported as a backup file. Non-permanent license can be only exported as a demo file for debugging interface purposes, which do not contain authorization information and cannot be used for actual use. |
--factory-reset | Factory reset (Please proceed with CAUTION). This will reset the configuration file, clear the database, user data, and logs, without affecting the authorization or model configuration files. |
-v | View component version numbers. |
-m | List the size of each model file. |
-h | View help information. |
5.4. Modifying the Service Port
The default service port is 7100. If you need to change it, please open the service.toml file in the installation directory with a text editor and modify the port number after port = on the second line, for example: port = 8888.
After saving and exiting, restart the service for the changes to take effect.
5.5 Service Management API
5.5.1. Authorization Management Related API
5.5.1.1. Generating Machine Code
Request Line
GET /auth/machine_codeResponse Parameters
| Name | Type | Description |
|---|---|---|
| status | string | Status code |
| message | string | Description of the status code |
| data | string | Machine code |
5.5.1.2. Input Authorization Code
Request Line
POST /auth/auth_codeRequest Parameters (JSON)
| Name | Type | Required | Description | Default |
|---|---|---|---|---|
| auth_code | string | Yes | Authorization code | Required |
Response Parameters
| Name | Type | Description |
|---|---|---|
| status | string | Status code |
| message | string | Description of the status code |
| data | string | null |
5.5.1.3. Query Authorization Status
Request Line
GET /auth/auth_statusResponse Parameters
| Name | Type | Description |
|---|---|---|
| status | string | Status code |
| message | string | Description of the status code |
| data | object[] | Array of authorization details |
| ├─ expiration_time | string | Expiration time "Persistent authorization." indicates a permanent license |
| ├─ expired | boolean | Whether the authorization has expired |
| ├─ max_connections | integer | Maximum number of concurrent connections allowed |
| ├─ name | string | Name of the service |
| ├─ sample_rate | integer | Sampling rate |
| ├─ service | string | Service code |
5.5.1.4. Export License Backup File
Only permanent license can be exported as a backup file; non-permanent license can be only exported as a demo file for debugging interface purposes, which do not contain authorization information and cannot be used for actual use.
Request Line
GET /auth/licenseResponse Parameters
License backup file license.dat
5.5.1.5. Import Authorization Backup File
Only permanent license backup files are supported for import; demo files exported from a non-permanent license can be only imported for debugging interface purposes, which do not contain authorization information and cannot be used for actual use.
Request Line
POST /auth/licenseRequest Parameters (form-data)
| Name | Type | Required | Description | Default |
|---|---|---|---|---|
| file | file | Yes | License backup file | Required |
Return Parameters
| Name | Type | Description |
|---|---|---|
| status | string | Status code |
| message | string | Description of the status code |
| data | object | Data |
5.5.2. Information Inquiry Related API
5.5.2.1. Query System Version
Request Line
GET /versionResponse Parameters
| Name | Type | Description |
|---|---|---|
| status | string | Status code |
| message | string | Description of the status code |
| data | object[] | Data |
| ├─ file | string | Component name |
| ├─ version | string | Component version number |
Components include:
| Component Name | Description |
|---|---|
| bin | Main program of the speech recognition service |
| libe2easr.dll | Speech Recognition dynamic link library |
| libvad.dll | Voice Activity Detection (VAD) dynamic link library |
5.5.2.2. Query Real-time Speech Recognition and Short Speech Transcription Connection Status
Also used to check connectivity.
Request Line
GET /asrResponse Parameters
| Name | Type | Description |
|---|---|---|
| status | string | Status code |
| message | string | Description of the status code |
| data | object[] | Data |
| ├─ lang_type | string | Language type |
| ├─ name | string | Display name of the language |
| ├─ sample_rate | int | Sampling rate |
| ├─ max_connections | int | Maximum number of connections |
| ├─ current_connections | int | Current number of connections |
5.5.2.3. Query Audio File Transcription Connection Status
Also used to check connectivity.
Request Line
GET /asr-fileResponse Parameters
| Name | Type | Description |
|---|---|---|
| status | string | Status code |
| message | string | Description of the status code |
| data | object[] | Data |
| ├─ lang_type | string | Language type |
| ├─ name | string | Display name of the language |
| ├─ sample_rate | int | Sampling rate |
| ├─ max_connections | int | Maximum number of connections |
| ├─ current_connections | int | Current number of connections |
| ├─ queue_task_numbers | int | Number of tasks in the queue |
| ├─ queue_task_duration | int | Total duration of tasks in the queue |
5.6. Moving or Copying the Software to Another Device
- Package the
asr-integrateddirectory and copy it to the target device, then extract it to a suitable location. Note that the path must not contain characters such as Japanese or Chinese.
Tip:
The
audioandlogfolders contain audio and log files, which may occupy a large amount of space. Depending on the situation, you may choose not to copy them to the target device.
- Clear the authorization, otherwise the program may exit. To perform this operation: double-click
asr-integrated\script\remove-license.bat, then typeyesand press Enter to confirm. - Follow the section
4.4. Launch for the First Timeto complete the activation.
6. FAQ
No Response to a Request
-
Please check if the service is running properly by looking in the Task Manager for a process named "Speech-to-Text System".
-
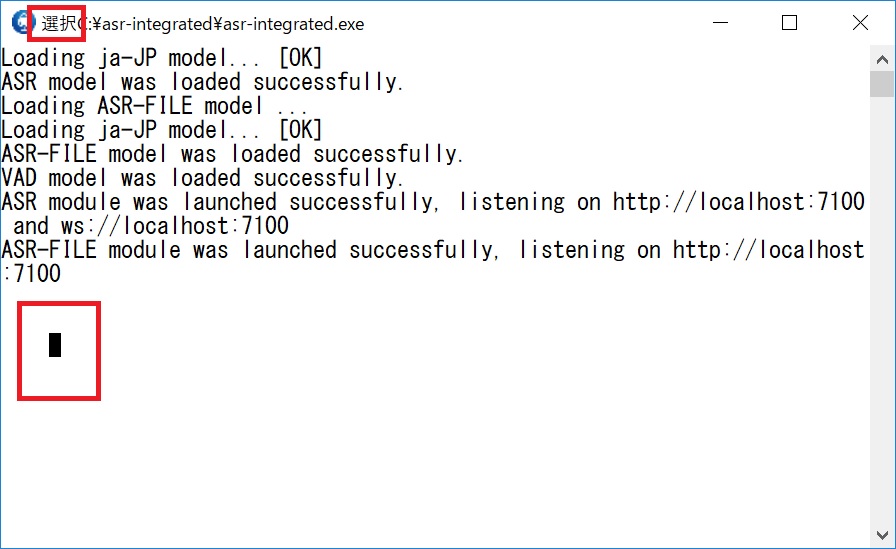
If the program is started by double-clicking
asr-integrated.exe, please check whether the command line window is in "QuickEdit Mode". The characteristics of the mode are: a fixed cursor on the screen and the title bar displaying the word "Select(選択)", as shown in the image below. Due to the operating system, the process pauses in QuickEdit Mode. In this case, left-click the title bar and then press Enter to exit QuickEdit Mode.